
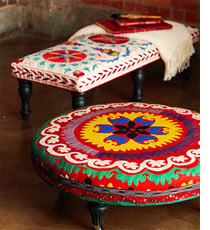
How To…Padded Ottoman
Posted by Odette Nieuwoudt in How To Guides
Using entry-level upholstery skills, minimal tools, and no sewing, we created these splashy little ottomans topped with graphic embroidered textiles.

- Fabric and muslin: Cut into a circle 30 – 40cm wider all around than the round plywood base. Choose a suitable fabric that is durable for this type of project.
- Batting: Cut 4 layers to the size of the plywood base.
- High-density foam: Cut to the size of your plywood round, using a serrated knife.
- Plywood or BisonBord: Cut one piece to the size required.
- Serrated knife
- Scissors
- Staple gun and staples (or get yourself a Bosch Tacker)
- Cordless drill/driver
- Feet or castors and screws
- Paintbrush

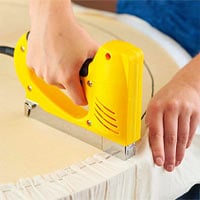
1. Using a marker, draw a guideline 10cm from the edge of the wood base. Mark four even points on the circle. Fold and press the muslin into fourths. Smooth muslin over the batting layers, turn upside down, then match up the folds in the muslin with the lines on the base. Start stapling the muslin around the wood base, keeping the muslin folds aligned with the marker points.
2. Centre decorative textile or fabric over the muslin, smoothing in place, then staple to the base as with Step 1, dividing into four sections and easing the fabric as you go.
3. Add a decorative edge by stapling the trim piece to the base. Allowing 5mm along trim edge, position right sides together, then staple to secure the trim.
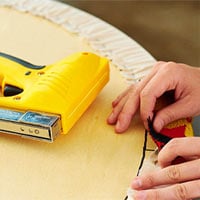
4. Turn back the decorative edge and glue in place with fabrics glue. Add decorative embellishments such as beads and sequins if desired.
5. Attach feet to the base (paint them first) with mounting hardware. Screw hardware to the base, then attach feet. Add decorative casters for a final flourish.

![]()
Comments
Add comment