Make Your Own Storage Ottoman
Posted by Odette Nieuwoudt in Project Plans
Make your own storage ottoman
Using a basic box design, here are some great ideas for decorating and dressing up a storage box so that it can be used in any room in the home. All you need is your imagination, a basic box, and accessories.

Go shopping!
With a few readily available items you can decorate a basic box in so many ways. Here are some items to look out for:
- Decorative moulding
- Framing accessories
- Upholstery trim, ribbon, batting and fabric
- Wrapping paper and decoupage materials
- Rust-Oleum Painter’s Touch Spray and Painting Kits
- Scrapbooking embellishments
- Cornice and crown moulding
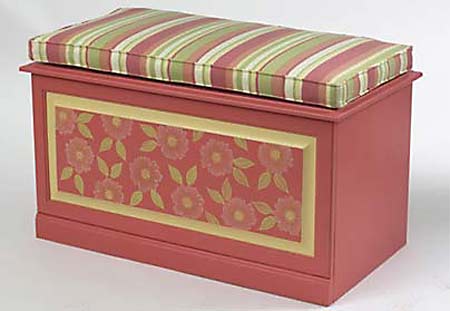
Stylish storage
Make up your basic storage box following the instructions above. This design (above and left) incorporates moulding strips that are attached using panel pins and wood glue. This flowering beauty can be topped off with medium density foam covered in striped fabric in colours to match.
Linen luxury
Upholstery adds a touch of sophistication to this chest, painted in soft green shades, making it perfect for any room in your home.

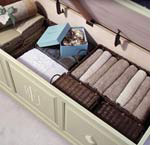
Gathering hope
Store a bit of your history-or practical items such as linens and out-of-season clothing-in a personalised storage box pretty enough to show off in any room. If you’re handy with a router, detail the front of the box to create even more interest.
If you don’t feel confident enough to make your own box – yet, sign up for one of our DIY-Divas workshops and we’ll show you how!

- Supawood, plywood (or marine ply for outdoors) – 16mm
- Decorative moulding
- 32mm wood screws
- Panel pins
- Wood glue
- Wood filler
- Drill, bit and countersunk
- Fine-grit sandpaper

1. Measure, mark and drill pilot holes in the end pieces at either side and at the bottom (where the ends will fasten to the base); countersink. Join a DIY Divas Workshop to find out more on making a basic box.
2. Position one end and two sides against the base. Screw the end piece into the sides and the base.
3. Place the other pre-drilled end into position and screw into the sides and the base.
4. Turn the unit on its side and drill two pilot holes at the bottom, 10cm in from either end; countersunk. Screw the side to the base and repeat for the other side.
5. Measure and mark for the centre divider (optional). Drill pilot holes from the sides into the centre divider; countersink. Screw the sides to the centre divider.
6. Measure the front and ends for the moulding. The moulding will be cut at a 45-degree angle – the inside of which will be the actual length of the front or ends. You will need to rotate the base plate of the jigsaw to a 45-degree angle depending on whether you are cutting to the left or right. This can be a bit confusing (unless it’s just me!). Practice with a section before you do the actual cutting.
7. Use wood glue and panel pins to attach the moulding to the front; match the end sections to the front moulding for a flush fit. Any faults can be fixed with wood filler and sandpaper.
8. For the lid/top you can either: a) use a piano hinge to attach the lid to the box or, b) use battens on the underside of the lid to create a lid that fits snugly and lifts on and off.
![]()
Comments
Add comment