Well Stocked Shop: Marking and Cutting Gauges
Posted by Siphesihle Hato in Encyclopedia of Woodworking
More than one way to make your mark
Many years ago when I began tooling up my shop, I quickly discovered how much I could accomplish with basic hand tools. Though many were antiques, it wasn’t long before they earned their keep and made my all-time favorites list. Among them were marking and cutting gauges like those featured here.
Consisting of a bar, a fence, and a marker, this simple tool is much more than the sum of its parts. A gauge makes laying out a one-handed operation. Marking and cutting gauges are useful for everything from preparing stock (establishing thickness and width), to joinery (laying out dovetails, mortises, and tenons).
Although I’ve known some woodworkers who can get by with just one gauge, I’ve found that one is not enough. Marking and cutting gauges may appear identical, but they’re not. Each excels in specific applications. Considering the small investment, it makes sense to own a few so you always have the right tool in hand.

Marking and cutting gauges
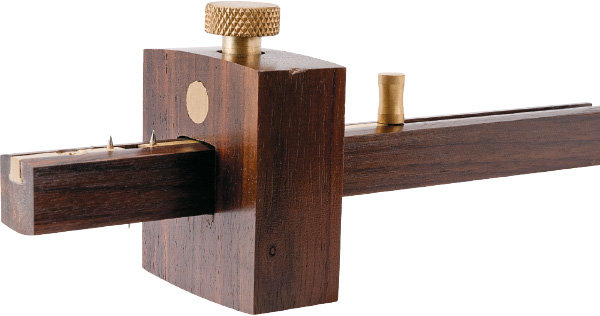
One of my first purchases was the only member of the gauge family that is technically called a marking gauge due to its use of a pin-style marker. Before the commercial models entered the scene, woodworkers and carpenters would often fashion their own gauges from scrapwood and finish nails.

A pin-headed gauge is good for establishing lines parallel to the grain, such as you’d need when laying out hinges, grooves for drawer bottoms, rabbets, or the thickness of a board when preparing stock by hand. In a pinch, you can also use it to scribe metal. However, the pin-shaped tip isn’t perfect; it leaves a fuzzy line when scoring across the grain and often gouges softer woods. Filing a flat on one side of the pin can correct the tendency to tear out, but your best bet is to partner it with a cutting gauge.

With a knife-edged marker, a cutting gauge excels at making crisp, clean lines across the grain. Compared to a pin-scratched line, the cutline helps prevent splintering and tear-out, a handy attribute when chiseling dovetails at their baseline. This line also offers a tactile edge for registering a chisel or saw blade in the scribed line prior to cutting. Unfortunately, super-sharpness isn’t an advantage when marking with the grain. Often, the wood will close up behind your cut and hide the line. For this, you’ll want to use a pin.

Multi-Marker
If you’re constantly resetting your gauge to a single measurement, a second gauge, like Lee Valley’s brass 3-in-1 gauge, may solve the problem. This gauge sports a head that you can outfit with a pin, knife, or blade, so you can select the cutter best suited to the task at hand.
What I like best about this tool is its size. Like a 4″ square, the compact gauge fits neatly into my apron pocket so it’s always in easy reach.

Wheeled gauges
The cutting wheel of a wheeled gauge can serve in place of a pin or knife. Unlike a pin, the wheel cuts equally well both with and across the grain. The resulting line isn’t quite as thin as a cutting gauge line, but is thick enough to see even when marking with the grain. I find that the bevel-edged wheel draws the gauge’s locking fence tight against the stock. (For seamless joinery, position the fence so that the wheel’s bevel faces the waste side of your cut.)
Wheeled gauges often have measurement lines printed on the bar. In addition to setting the gauge to scribe a line, you can use this tool to measure the depth of a drill hole or mortise. Simply drop the bar into the opening until the cutter touches the bottom of the cavity.

Mortising gauges
While you can employ any of the gauges mentioned above to lay out mortise-and-tenon joints, if you plan to do a lot of handwork, consider adding one more gauge to your assortment. Mortising gauges have two markers, saving time and avoiding the mistakes that come from constantly resetting a single-marker gauge.
Instead of relying on dimensions, set the pins to correspond with your chisel, router bit, or drill bit, and then lay out your mortises in one pass. You can also lay out the corresponding tenons with the same setting. Remember to keep the fence along the “best” face of your stock to ensure that the joint members line up.

Controlled curves
At times, woodworking requires a few curves. Whether you’re rounding a corner, or building a part for a jig or fixture that must pivot or tilt, it’s important that the curves are even, and the groove sides are parallel.
Sure, you can use a carpenter’s gauge like a standard gauge, but it really shines when you want perfect curves with consistent radii. To convert this gauge into “compass mode,” simply flip the fence so that the pin end points down. Use the measurements on the bar to ensure that your radii are spot on.
![]()
Article by: Jeff Day
Comments
Add comment