There’s a mug born every minute
Posted by jasonmain in Project Plans
Let’s face it, morning is not my best time… as, unlike during the rest of the day, I am pretty dozy. I have no idea where I am going, when I get there I have no idea where I am or what I was supposed to do, having done it I have no idea what I have just done, and upon returning to my nuptial pit, have no idea where I have been.Well that doesn’t last long. Within a microsecond, I know exactly where I was, what I did – and what I have done! “I’ve just had the carpets done and you’ve left a trail of coffee down the passage!” (This is expressed in… how can I explain it? ‘Strident tones’. Got the idea?)
Anyway, I decided to make at least some sort of ‘dam’ so that any spills could be contained – and that meant lugging the morning fix through on a tray. The problem is, all our trays are pretty big, and quite shallow, so there was a good chance of banging into something, like the walls, and dropping the whole shebang.
Hence, this tray…

DIFFICULTY: Beginner
ESTIMATED TIME: Four hours
COST: /- R 90.00 (if you have handles then R 60.00 or so)
MATERIALS:
- Masonite: 3 x 240 x 160mm
- Two handles and screws
- Edging (I used a length of L-profile moulding (the most expensive item – about R45 for a 1,8m length, the shortest available)
- Wood glue and the finish of your choice – I chose a satin sheen water-based paint.

Step 1:
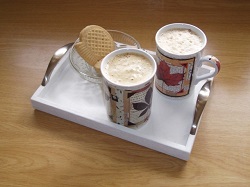
Measure the base, 240 x 160 gives you room for a maximum of four mugs, or two plus a peace offering – a small bowl of shortbread.
.JPG)
Step 2:
Cut the Masonite to size
.JPG)
Step 3:
Check the size. As you can see in the pictures, three mugs are easily accommodated.
.JPG)
Step 4:
Start cutting the sides
.JPG)
Step 5:
The ends are mitred – note the use of the clamp to keep fingers well out of the way of the blade.
.JPG)
Step 6:
Dry-fit the sides and when satisfied…
.JPG)
Step 7:
…apply glue to all the edges…
.JPG)
Step 8:
…and clamp.
.JPG)
Step 9:
I used a small can of paint on which I balanced a 5-litre can to hold the base firmly against the sides; this also ensured that the tray was exactly flat.
.JPG)
Step 10:
Before painting, I aligned the handles and marked the positions of the holes for the attachment screws.
.JPG)
Step 11:
Use an awl to make the center point of each hole.
.JPG)
Step 12:
When drilling the holes, make sure they are exactly perpendicular; a drill press is a great helper in these cases.
.JPG)
Step 13:
Paint the tray and allow it to dry; sand lightly and apply a second coat; attach the handles only once the painting is completed.
.JPG)
.JPG)
Comments
Add comment