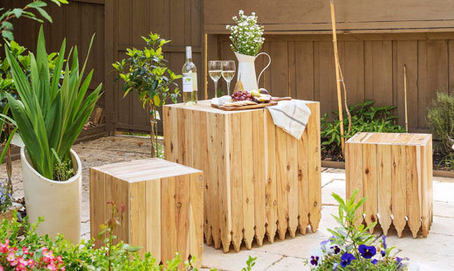
Simple PAR Pine Garden Table and Seats
Posted by jasonmain in Project Plans
Perfect for a sunny spot in a courtyard, on a balcony, or even on a small deck, this decorative pine table and matching seats won’t cost you an arm and a leg, is easy to make, and you’ll find everything you need for this project at your local timber merchant – or you can use reclaimed timber.

DIFFICULTY: Moderate
ESTIMATED TIME: Weekend
COST: +/- R300
MATERIALS:
- To make one seat:3.5 x 35mm screws
- 4.5 x 45mm screws
- No More Nails adhesive and caulking gun
- Drill/Driver plus assorted bits
- Countersink bit
- Carpenter’s square
- Mitre saw or jigsaw
- Orbital sander plus 120- & 240-grit sanding pads
- Tape measure and pencil
- Plascon Woodcare Sunproof varnish
- Varnish brush
- 10 of 65 x 1800mm PAR pine – table and chairs
- 23 of 44 x 1800mm PAR pine – battens

At your local timber merchant you will find PAR (planed-all-round) pine in different widths. Modify the size of the tables depending upon the width you are able to source. The best width for this project is around 69mm. For the decorative edge at the bottom, make up a cardboard template that you can use to transfer the design onto the PAR pine and cut out with a jigsaw. Cut the side pieces to a 450mm length.

Working on a flat surface and place cut pieces side by side. Cut 2 pieces of pine batten to width. Place one batten 30mm up from where the top of the decorative cuts and the other 20mm down from the top. Measure accurately, as this top batten secures the seat/top. Drill pilot holes along each battern and secure 3.5 x 35mm screws. Repeat for the other long-batten side panel.

For the shorter sides, place 5 more cut boards face down and secure with shorter battens. Repeat to create a second short-batten panel.

Position one long-batten panel with battens facing up, then align a short-batten panel on top of it, battens facing down. Using a panel on the edge as a guide, predrill 3 equally spaced pilot holes through the face of outer picket on one side of short-batten panel. Countersink drilled holes.

Drill pilot holes in the edge of the long-batten panel, aligned with clearance holes in short-batten panel. Repeat to drill pilot holes in the remaining panels.

Place a long-batten panel with battens facing up. Position a short-batten panel on the edge and align pre-drilled holes. Fix together with 4.5 x 45mm screws. Repeat for the other sections to create two half sections for the seat.

As shown left, fit two assembled halves together and align the edges so that they are flush. Drill pilot holes through the sections of short-batten panels into the sections of long-batten panels. Countersink and fix together with 4.5 x 45mm screws.

Stand into an upright position and measure between the short-batten panels – inside measurement. Cut 5 offcuts to this length – for a snug fit as seat/table top. Run a bead of No More Nails adhesive around top and, starting from one end, fit the cut pieces in place. They should sit flush with top edge of the side sections.

Use 120-grit sandpaper to even out all the edges and then 240-grit sandpaper to smooth. Wipe clean to remove all traces of dust before applying 2 coats of Plascon Woodcare Sunproof or exterior varnish.


![]()
Comments
Add comment