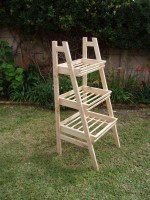
Plants for higher… and higher
Posted by jasonmain in Project Plans
It’s actually not that difficult to build this and it gives you quite a bit of space for herbs, trailing plants, and – when your reach my ripe old age (chronological – 62; mental – 30; emotional – who knows; maturity – don’t even ask) and it gets harder to bend down – you don’t have to, bend that is.

DIFFICULTY: Intermediate
ESTIMATED TIME: A Weekend
COST: +/- R400.00
MATERIALS:
- SA Pine:16mm dowel sticks – 7m
- 10mm dowels – 500mm
- 22mm x 44mm – 6m
- 9mm x 44mm cover strip – 3m 22mm x 69mm – 1200mm
- Finishing washers
- One bag 40mm x 6mm gauge screws
- Finish of your choice (I used a colourless wood preservative, but it would also look good if you painted it white)

Step 1:
To start off, cut the legs – the rear are 1 200mm, and the front, angled at 15 degrees are 1 250mm. Then I cut the top horizontal brace – bottom end 95mm, top end 83mm – and the lower horizontal brace – bottom end 358mm, top end 345mm. There are only two angles used in this project – 90 degrees and 15 degrees.
.JPG)
Step 2:
Lay out the first side and do a dry fit to ensure everything matches up; also make sure the tops of the legs line up.
.JPG)
.JPG)
Step 3:
Next, I used a length of 22mm x 44mm to set the distance from the top (being essentially bone idle, I use the easy way wherever possible).
.JPG)
Step 4:
I then used a 10mm dowel to secure each join securely.
.JPG)
Step 5:
Clamp the pieces in position – note the use of the angled offcut to give the clamps parallel surfaces on which to work.
.JPG)
Step 6:
Drill right through to a depth of 90mm or so. For the front I drilled at 90 degrees to the leg’s surface, hence the angled hole into the top brace; the same applied in the case of the lower brace.
.JPG)
.JPG)
Step 7:
Once the first leg was assembled, I used it as a template for the second. Clamp all the pieces in position on the first leg, drill the dowel holes and apply glue. To prevent the legs sticking together as excess glue is expelled from the joins, I used small scraps of paper to shield the wood.
.JPG)
.JPG)
Step 8:
While the legs were curing, I assembled the trays. The sides are as per the illustration – note the detail in the illustration showing the dimensions of the trays are the top lengths. I positioned the dowels 30mm from each end and 15mm up from the lower surface.
.JPG)

Step 9:
A gauge sets the centres 15mm above the bottom end of each side. Spacing of the dowel is arbitrary. I used six for the bottom tray, five for the centre and four for the top tray; there need to be sufficient to ensure proper support for pot plants and to help give lateral strength to the unit. For example, the centred spacing of the dowels was 70mm, 70mm and 74mm in this unit for the top, centre and bottom trays.
.JPG)
.JPG)
Step 10:
Cut the dowels to 455mm, apply glue and seat them in their holes – drilled using a space bit with tape as a marker to give a hold depth of about 9mm. To ensure the trays are square, measure the diagonals; tweak as necessary by applying a little extra clamping force in the required plane. It’s as well to note here, however, that your drilling and cutting to length must be accurate; never use brute force to make square something that isn’t – the join will simply give way – if not during the clamping, then afterwards.
.JPG)
.JPG)
Step 11:
I ripped some of the 9mm x44mm cover strip down the middle to make the front crosspieces. Be sure to drill pilot holes for the screws; if you don’t, the wood will split. The finishing washers are my artistic flourish.
.JPG)
.JPG)
Step 12:
The rear is simply a length of 9mm x 44mm attached. Once this is done the trays are complete, they’re light and sturdy, and the use of dowels means that water dripping from the plant trays will not pool, but simply drop off. Attach the trays at the desired spacing. The spacings I used are simply a guideline; you may decide to make the unit taller, shorter, or whatever. Note: As shown in the illustration detail, the trays are inset 9mm so that the rear 9mm x 44mm cross member is flush with the rear edge of the rear legs.The unit is complete. In passing, I designed this for pot plants, but there’s nothing stopping you using it, adapted or not, as a vegetable rack in the kitchen, or as a rack for towels in the bathroom.
.JPG)
.JPG)
.JPG)
.JPG)
Comments
Add comment