8 Top Tips for Accurate Measuring & Cutting
Posted by jasonmain in Tips & Tricks
Measure twice, cut once. It’s an age-old phrase that you’ve probably heard many times, but for good reason. It’s all-too easy to measure wrong, so it’s always a good idea to double check yourself—especially since most of us rarely cut the piece too long. Here are a few other tips that will help you measure, mark, and cut your pieces accurately.
![]()
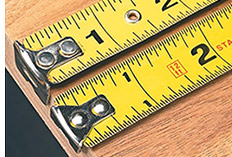
Most of us have more than one tape measure lying around, but be careful when you grab a tape to work on projects. Compare any two tape measures, and you may find that the readings vary slightly from one to the other. So, if you’re working on a project where a small difference in measurements can cause a big problem, use just one tape to measure all of your project parts. Even if the markings on the tape aren’t totally accurate, your measurements will still be consistent.
![]()
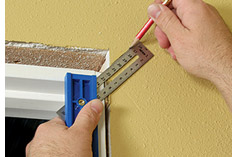
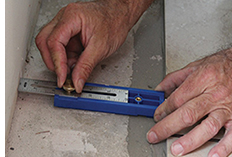
Tape measures are great, but they can’t do it all. Many projects will require specialized measuring devices, from squares to levels to compasses and protractors. Invest in a few good measuring and marking tools, and you’ll find measurements are easier to make and more accurate. Some tools, like a framing square or the Kreg Multi-Mark can perform multiple measuring and marking tasks.
![]()
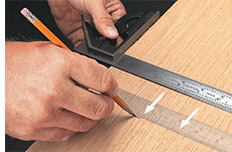
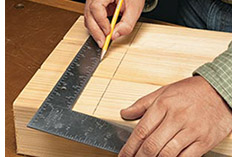
This one has happened to all of us. You mark where you want to cut, slide a ruler up against it to mark a line, and the line ends up beside the mark instead of on it. To prevent that, hold the tip of your pencil on the mark, and then slide your ruler against the pencil. Now, when you draw your line, it will be exactly where you wanted it.
![]()
A regular pencil is usually the go-to tool for marking cut lines, etc., but it may not be the best choice. For dark surfaces, use a light pencil. If you’re worried about leaving a permanent mark, try chalk. On tile or other smooth, hard surfaces, a marker may work best. If you’re worried about leaving marks that can’t be removed, apply tape to the surface, and then make your marks on the tape.

![]()
Much of the time, building a project means cutting pieces to a size specified—either from your measurements or from dimensions specified in a set of plans. Sometimes, though, it’s best simply size a piece to fit instead of worrying about if it fits a specified dimension. This is especially true when you’re making things like doors or drawers that need to fit inside another assembly, or when you’re fitting the last piece in a group, like a floorboard or tile.
![]()
Any time you need to make more than a few parts that will be the exact same size, it’s best to measure and mark them at the same time. You’ll be more likely to remain consistent from part to part. Of course, this is a good time to practice that old adage we mentioned first—measure twice, cut once—to make sure you get all the parts right, instead of all wrong.
![]()
Any time you’re cutting using a miter saw or table saw, another great tip for getting project parts all sized exactly the same is to use stop block. Whether it’s a built-in stop block, like on the Kreg Precision Trak & Stop System, or a homemade one, you can simply butt your parts against the block and cut them without having to measure and mark each one.

![]()
While stop blocks are helpful, they won’t necessarily work with all types of tools. Some tools, like the Kreg Rip-Cut, though, are equipped with built-in measuring scales that can be very handy. Instead of having to measure and mark your project piece and then align the tool with your mark, a built in scale can allow you to skip those steps and simply set the tool to the measurement you need. Then you’re ready to cut your parts accurately.


Comments
Add comment