4 Tips for Tight-Fitting Kreg Joints
Posted by jasonmain in Tips & Tricks

![]()
One of the best things about Kreg Joinery™ is that it means you don’t have to cut complicated “woodworking” joints. You just cut your pieces to size, usually with straight, square cuts. Of course, for the joints to fit together right, you need to make sure that those cuts are truly square.

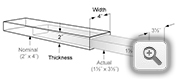
Whether you’re using a miter saw, table saw or circular saw, start by making sure that the blade is cutting square through the thickness of the piece, as shown in the illustration. If this angle is off, you’ll end up with a joint that’s not flat, or with a gap in one face of your joint. To eliminate those problems, make sure the blade is adjusted so it sits exactly 90° to the base or table.
Next, you need to check that make sure the blade is cutting square across the width of the piece. If this angle is off, you’ll end up with a joint that’s not square or that has a gap in one edge. Again, you need to make sure the blade is at an exact 90° angle. On a miter saw, the fence usually doesn’t move, so you’ll need to adjust the blade.
On a table saw, you’ll adjust the angle of the miter gauge until it sits square with the blade. If you set your miter gauge at 90° and the cuts still aren’t square, you may need to make some adjustments to the saw.
A circular saw presents a challenge, since it’s tough to make a prefect cut freehand. To get around this, you can use a helper to guide your saw. A speed square will do the job, or you can get a tool like the Kreg Square-Cut. It positions your blade and provides a fence for the saw to ride against.

![]()
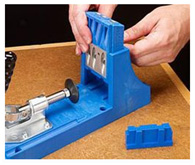
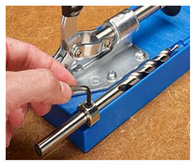
Once you have your pieces cut correctly, you need to set up your Kreg Jig® to drill the pocket holes in the proper position. Thankfully, the process is easy. Start by adjusting the Drill Guide Block (or the Positioning Sliders on the Kreg Jig ®) based on the thickness of the wood you are using. The thickness settings are clearly marked, and the setup is explained in your owner’s manual. Just remember that you need to use the actual thickness of your wood, not the nominal thickness. For example, a 2×4 board has an actual thickness of 1-1/2″. Next, set the Depth Collar on the drill bit. Again, you’re setting is based on the thickness of your wood. You’ll find a drill bit setup gauge on the base of the Kreg Jig®, and inside the Kreg Jig.® carrying case. The key thing to remember is to align the bit’s “step”—not the tip—with the markings.
![]()
When you drive the screws into a Kreg Joint, they will pull the two pieces tightly together. Because you’re driving the screw at an angle, though, the screw may pull the pieces slightly out of alignment. If this happens, the faces of the two pieces won’t sit flush.You can prevent this easily by clamping across the joint line. Kreg’s Face Clamps provide an easy way to clamp the joint and hold the pieces perfectly flush. You’ll notice that the clamps have clamp pads of two different sizes. Position the clamp so that the larger face is on the “show” side of the joint. Then just drive in the screws, and you’ll have a flush, tight joint.


![]()
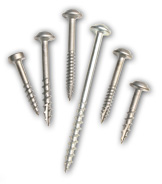
When you’re screwing the joint together, make sure you select the correct screw. Kreg screws are available in different lengths to work with different thicknesses. Selecting the correct length is easy, since it’s based on wood thickness, just like setting up the jig. Kreg screws are also available in fine thread and coarse thread. As a general rule, fine thread is best suited for hardwoods (such as oak, cherry, or maple), while coarse thread screws are best for softwoods (pine, fir, etc.) Please see our article choosing the correct Kreg screw. By following these simple tips, you’ll be able to create strong, tight-fitting joints quickly and easily using your Kreg Jig.

Comments
Add comment