Tips & Tricks: Router-Table Trickery
Posted by Siphesihle Hato in Tips & Tricks
If a router is the most accessorized tool in the shop, a router table would have to be its best accessory. In last issue’s “Router Table Basics” story, Joe Hurst-Wajszczuk showed how to set up and use a router table to perform an array of essential functions. Here, I’ll take things up a few notches, and perform some unusual tricks you probably haven’t seen. Some of these techniques you may end up using on a regular basis. Others, you may pull into play only infrequently, but when you do, boy, you’ll be glad you know them! Some involve making router table accessories, but nothing is difficult or expensive to build, and the set-ups are simple. I think you’ll find these approaches to be very helpful. And, as you learn to view the router table in more expansive terms, it’s a good bet you’ll come up with some magic of your own.

2 great guards for big bits
Router bits can be vicious, especially when they’re large and/or exposed. Big-swinging panel-raising bits are particularly fear-inducing, even to router table veterans. So are large pattern-cutting bits that stand proud and unencumbered at the center of the table. I don’t take chances with these cutters, and have devised a couple of easy-to-make guards to ensure that I leave the world sporting all the digits I entered with.
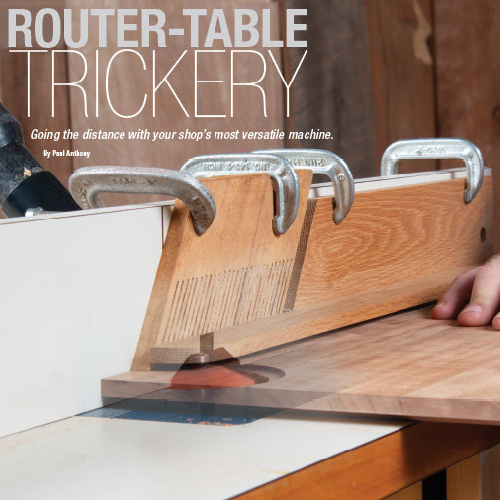
Safe, secure set-up for panel raising. This 2-piece set-up consists of a featherboard to keep the work pressed against the table for a clean, consistent cut, and a cantilevered bit guard to keep fingers away from the huge cutter. Clamp the featherboard to the fence first, and then secure the clamping board to the fence, with the bit guard raised 1⁄4″ or so above the work. I’ve noted here the thickness of my parts, which work well for the job, but feel free to suit their overall dimensions to your particular fence.

Overhead protection. A simply made overhead guard consisting of an acrylic plate screwed to a thick clamping beam will prevent your fingers from contacting an exposed bit when pattern-routing. A hole in the plate ensures good bit visibility if dust clings to the acrylic. Extend the beam to the edge of the table, clamping the end securely in place.

Fence mods
A router table’s fence is its primary accessory. In its most basic form, a fence may simply be a board clamped to the table top. But better fences make for better work. Ideally, you want a 2-piece split fence, whose center opening can be adjusted to minimize space on either side of the bit. A split fence also allows use of a center insert to ensure workpiece bearing throughout the cut, as shown.
Fence insert. A fence insert can be cut out to match a bit’s profile, effectively closing up what would otherwise be a big fence gap that might impede smooth feeding. One way to mount an insert is to bevel its ends for capture behind the mating beveled ends of a 2-piece sliding fence.

Tall fence for a solid stance. An auxiliary tall fence is essential for stability when feeding large panels on edge or long pieces on end. Make the fence panel from smooth, dead-flat material like melamine coated particleboard (MCP) or laminate-covered medium density fiberboard (MDF). Attach the panel to a sub-fence that connects to your router table fence with fence clamps. (See buyer’s guide page 70.)

Outriggers for more reach. An auxiliary outrigger fence provides support for long stock. Just as importantly, the extended fence offers a place to clamp stops for operations such as routing a stopped rabbet on a long workpiece. As shown here, a board to be rabbeted is butted against the trailing stop, then pivoted against the spinning bit, and fed forward until hitting the opposite stop. Again, this accessory is attached to the router table fence with fence clamps.

Round routing
Shaping disks and other round stock on a router table can be challenging because a straight fence won’t guide your work. However, a couple of simple jigs will allow you to safely and accurately rout edge profiles on disks, and turn round tenons on the ends of round stock. You can even create round stock with the aid of common roundover bits.
No pilot? No problem. Normally, a bit needs a bearing to pilot it around the edge of a disk, but this birds-mouth panel solves the problem. Clamp the panel in place so that the profiling bit engages the edge. Then firmly press a disk against the inner edges of the panel and rotate it as shown.

Lathe-less tenons. All it takes to turn a round tenon on the end of round stock is a simple cradle jig and a straight bit. Position the fence as a depth stop to set the tenon length. For a clean cut, advance forward to the stop, fully retract the piece, rotate it very slightly counter-clockwise, and then advance fully again. Repeat until the tenon is complete.

Simple spindles. The trick to creating a dowel is to begin with a length of stock that’s perfectly squared to a thickness that’s exactly twice the radius of your roundover bit. Then round over each edge of the stock in turn, stopping short of the ends to keep it from rolling during cutting. The best approach for long stock is to use outriggers with stops, and maneuver the work the same way you would to cut a stopped rabbet.

Small parts safety
Small parts are typically more easily worked on the router table than with a hand-held router. Even so, care must be taken to ensure safety and precision. As you might guess, it’s all about maintaining a good grip on the work. Here is a couple of tips to help toward that end.
A helping handscrew. This wood-bodied clamp provides a great way to hold small work securely while keeping your fingers a safe distance from the bit. The clamp’s jaws won’t damage the bit if they accidentally make contact.

Pushy pads. Commercial push blocks sold for jointer and table saw feeding can be just the ticket for handling small work at the router table. The non-skid rubber padding grips a workpiece firmly, while the large handle keeps the bit at bay.

Jointing and full-cut profiling
In a pinch, you can use your router table as a jointer. For example, plywood can beat up high-speed steel jointer knives, but won’t affect a carbide router bit, so that’s when I’ll set up my router table for the job. The same offset-fence principle used for jointing provides sure-footed outfeed when completely profiling an edge.

An instant offset for jointing. To set up for jointing, use double-faced tape to attach a strip of plastic laminate to the outfeed section of your fence. Then use a straightedge to adjust the laminate facing tangent to the outside diameter of a carbide straight bit, as shown at left. Now the cut surface will contact the laminate, solidly supporting the workpiece as the rest of it is cut.

Full-cut support. When routing a bullnose or other full-cut profile, adjust and use the same jointing set-up to ensure full support of the leading end of the workpiece after it passes the bit.

Flush-trimming tricks
A table-mounted router does a great job of trimming away protrusions like solid wood edging and miter joint keys. The trick here is the proper workpiece support and the use of appropriate riser blocks. In one case, you’ll raise the fence, and in the other, the workpiece.

Shelf edging shave. To set up for trimming shelf edging, install a flush-trim bit in your router, and mount your tall fence on riser blocks that are thicker than your shelf edging. Then use a straightedge to set the fence tangent to the router bearing. Now, when you feed a shelf upright, its projecting edging rides under the fence, allowing the shelf panel to press against the bit’s bearing so it can do its trimming as designed.

![]()
Article by: Paul Anthony
Comments
Add comment