How To: Hand Plane Problem Solver
Posted by Siphesihle Hato in How To Guides

Use this simple 4-step strategy to turn an old plane into a super shaver.
I’ve lost count of the number of planes that I’ve brought back from the brink, but if I added up the tools that I’ve bought, plus the orphans that have been left in boxes outside my door, the number would hit quadruple digits. Surprisingly, I’m still eager to resuscitate the next plane that lands on my bench. Some might consider me an old-tool addict, but what’s wrong with the rush that comes from bringing new life to an old tool, or helping a fellow woodworker put a cherished hand-me-down back into service? Emotions aside, hand planes are more than just historical artifacts. With a little know-how and a healthy helping of elbow grease, most can be turned into practical tools for any modern-day wood shop.
I don’t endorse the “they don’t make ‘em like they used to,” mantra, but I know that savvy shoppers can buy a good vintage plane for a fraction of the cost of a brand-new tool. In many instances, an old plane can be put back to work with about the same amount of effort as prepping a new tool.
As you’ll see, my approach to restoration focuses more on function than form. I don’t obsess over showroom shine, or advocate taking extreme measures. My four-step approach is a practical “middle ground” tune-up strategy. I find that I can get a salvageable plane up to shaving speed in less than an hour. From this point, I’ll decide if I want to put it to work, or put it out to pasture. I’ve bought a few boat anchors in my day. To improve your odds, check out “Buyer Beware” on page 33.
Step 1: Start with a careful cleaning
To make your initial diagnosis, disassemble the tool and give the parts a thorough cleaning. This step enables the moving parts to function smoothly, and provides you with an opportunity to inspect for cracks, chips, or missing parts. (To familiarize yourself with the nomenclature and ensure that your plane has all its parts, refer to the figure, right.)
To start, remove the lever cap, chipbreaker, and blade, and then remove the tote and knob. Next, remove the frog from the body.
There are a variety of commercially available rust-removing solutions, but light rust can be knocked off with mineral spirits and a Scotch-brite® pad or Sandflex blocks. To remove pitch and assorted crud, I use Simple Green® and an old toothbrush. I find a grinder-mounted wire wheel is particularly helpful. To knock off rust without digging into the steel or scouring off the paint, I outfitted my grinder with a fine-wire “carding” wheel that’s used by gunsmiths (see Buyer’s Guide on page 62). After rinsing and drying the metal parts, use compressed air to blow out any grit from the threaded holes (this debris can ruin the screw threads) and reassemble the tool. Apply a light machine oil to the threads and moving parts, and paste wax to the freshly cleaned surfaces to prevent rust and restore the luster.
At this point, I’m eager to make a few test shavings, so I skip Step 2, and switch in an iron from another tool. If the plane produces silky shavings, you’re on the right track.

Clean & Diagnose


Two wheels, no waiting.
I outfitted my grinder with a gunsmith’s carding wheel to remove rust, and a buffing wheel (charged with HUT Dark turner’s finish) to revive the shine on wooden parts.
Bring back the blade

Use a honing guide and abrasives to do the heavy work. Adhered to a granite plate, coarse-grit sandpaper establishes a bevel almost as quickly as a grinding wheel, but without any risk of overheating the edge.
Start sharpening. Without adjusting the guide, switch to your stones and hone the bevel. If you want to add a microbevel, the Veritas MK II makes it easy.

Check the chipbreaker
Dress the edge. Using a side-to-side motion, clean up the breaker’s inside edge as shown. To maintain a consistent angle, hook your fingers over the edge of your bench.
Round the top. Dressing the breaker’s top face encourages shavings to pass through without a pause. Sand away any bumps or nicks, then use a buffing wheel to polish it up.
Step 2: Sharpen (or switch out) the iron
Older plane irons can take and hold a keen edge, but some aren’t worth saving. If the back has deep rust pockets, you may not be able to undo the damage. Even with a freshly honed bevel, the pockets will create divots on the edge that will produce track marks on your freshly-planed surface.
A short iron suggests that a plane has seen a lot of use. Unfortunately, repeated sharpenings may have removed the hardest steel (the hardening process reaches in about an inch from the edge). If there’s less than 2 inches of blade from the long slot, the steel may not be hard enough to hold an edge.
Several companies offer replacement blades (see the Buyer’s Guide on p. 62).
Many of these substitutes are thicker than the original irons; a few require you to open up the mouth with a file. Although some woodworkers find that thicker irons resist chatter, I don’t think the difference justifies the extra work. I’m also reluctant to make modifications that might affect the tool’s value. When a plane isn’t performing up to par, 99% of the time it’s because the blade is overdue for a honing.
Step 3: Check the chipbreaker
A properly tuned chipbreaker forces shavings up and out of the plane. The constant breaking/curling action also helps prevent tearout. In order to accomplish this, the leading edge must be in full contact with the back of the iron, or it will snag shavings and choke. Inspect the chipbreaker’s fit as shown above. If you see light between the leading edge of the breaker and the blade, correct these problems by sanding, and then take time to smooth the breaker’s top face.
To straighten a twisted breaker, secure it in a vise and apply force in the opposite direction. As a final step, smooth the top of the breaker to encourage shavings to pass out of the throat.
Flatten the sole

Start lapping. After assembling the plane, retract the blade, and use light pressure until you achieve an even scratch pattern on the sole.

Key points of contact. Focus on the indicated areas. Use marker lines to gauge your progress

Smooth edges. Use a mill file to remove burrs and soften sharp edges.
Take a test run

Start shaving. Secure a test board to your bench. While running the plane across the wood, rotate the depth adjustment knob and make lateral adjustments until the blade contacts the wood evenly. If your plane produces a feathery, full-width shaving, it’s ready to be put to work.
STEP 4: Flatten the sole
For a plane to work effectively, its sole needs to be flat. Fortunately, this step isn’t as tedious as you might think. The trick is to focus on what matters. First, the sole doesn’t need to be a mirror. A few scratches or hollows won’t affect the tool’s performance.
I start flattening with 100-grit sandpaper, and finish with 180. For a special plane, I might work up to 320. Silicon carbide sandpaper is suited for metal, but I find that premium aluminum oxide lasts longer and cuts more consistently.
A reliably flat reference surface is important. For longer planes, you can use a piece of float glass, or the cast-iron top of your table saw or jointer. For shorter planes, I prefer a granite surface plate.
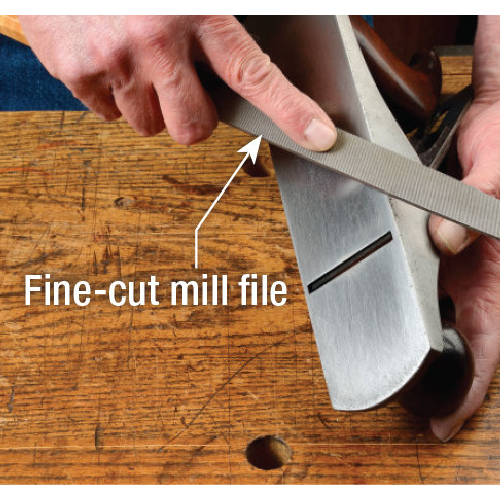
Because the cast iron plane body is slightly flexible, it’s important to lap the sole when the plane is fully assembled and “tensioned” as it would be when in use. Mark the sole, then start scrubbing, as shown. When the key areas are clean, run a fine mill file along the outside edges and the mouth opening to remove any burrs or sharp edges that might gouge your work or cut your fingers.
Finally, wipe away or blow off any abrasive and metal particles, rub a little wax on the sole, and give it a test run.
Buyer Beware: What you can’t fix

A plane by any other name…
If the plane is missing a few parts, you might have a problem. In most cases, parts for Stanley planes are interchangeable. Non-Stanley planes can be different story. Although these planes look similar (a few were made by Stanley), there’s a chance that a screw might have a unique thread, or a that frog might not seat properly. Even if you can find replacement parts, you might still be stuck with a poor performer.
My advice? If you’re looking for a good user, I’d stick with Stanley. Sargent, and Miller’s Falls. These three companies made high-quality tools. Replacement parts for these planes are available online.

Steer clear of cracks
This plane seems promising, until you check the flip side. This welded crack suggests that it may be at the end of its useful life. A resourceful woodworker repaired the damage after a hard fall, but it’s impossible to tell if the sole is still flat, or if the weld will hold when the plane is put to work. Keep looking.

Pick a plane with real potential
Oldies aren’t always goodies. Tools have always been made to different price points. At first glance, the wood and shape of the tote suggests that one plane is better than the other. Removing the lever cap and blade reveals other major differences that can’t be cured with a tune-up.
0 Comments
![]()
Article by: Craig Bentzley
Comments
Add comment