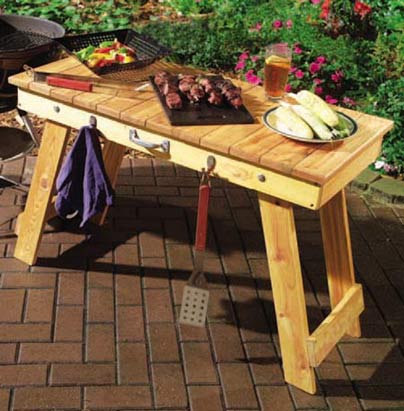
Foldaway braai table
Posted by Tanya Schutte in Project Plans
Heat up some charcoal and set this table up in less time than it takes to open a cold beer.
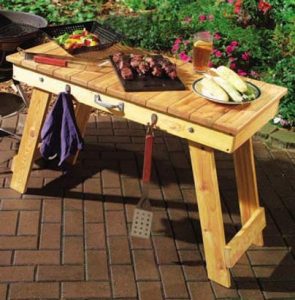
The legs of the table tuck under the top for easy storage, and a handle attached to the front makes it portable. The table is made from 90 x 19mm Meranti – you can also use Pine – sealed with a Woodoc exterior finish.
YOU WILL NEED:
[12] A – Top slat – 480 x 90 x 19mm
[2] B – Long side piece – 1060 x 90 x 19mm
[2] C – Short side piece – 400 x 90 x 19mm
[4] D – Leg – 730 x 90 x 19mm
[2] E – Leg stretchers – 400 x 90 x 19mm
[2] F – Leg spacers – 200 x 90 x 19mm
[4] G – Leg stop blocks – 110 x 90 x 19mm
Wood screws
M10 x 60 cup head bolts, washers and wing nuts
TOOLS:
Jigsaw, Drill/Driver, screwdriver, drill and countersink bits, clamps.
HERE’S HOW:
1. Use a jigsaw or handsaw and a square to cut the boards for the top and the frame. Assemble the frame, drilling two holes at the ends of the longer frame boards and adding a countersink hole for the screwheads to nestle into.
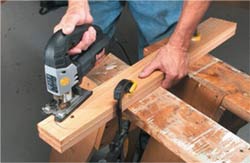
2. Clamp the leg boards together (rough side in) and cut them at the same time to ensure identical pieces. Before unclamping, drill the 10mm bolt hole in the upper end.
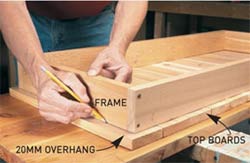
3. Place the slats top-side up on a flat surface, leaving 2mm gaps between each. Centre the supporting frame on top, leaving a 20mm overhang on all sides. Trace the frame shape on the slats with a pencil to make it easier to drill holes.
4. Remove the frame and drill two holes on each top board end with a countersink bit, using the traced lines as a guide. Screw the slats to the frame using a nail as a spacer between the boards. End slats should overhang by 20mm to match the side overhang.
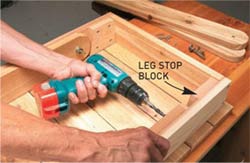
5. Flip the tabletop upside down and screw a pair of angled leg stop blocks in one end of the frame. Butt rounded ends of the legs against the blocks. Drill through the frame and bolt on legs with M10 x 60 cup head bolts, washers and wing nuts.
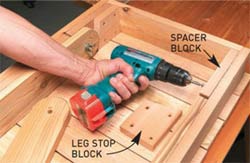
6. Screw spacer blocks in the other end of the frame to allow the other pair of legs to nest inside the first. Drill and bolt on the leg stop blocks and the second pair of legs using the longer M10 x 90 cup head bolts.
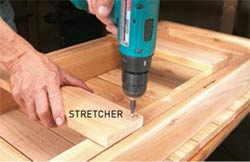
7. With the legs flat on the underside of the table, measure the length of the stretchers. Cut, drill and fasten them across each pair of legs.
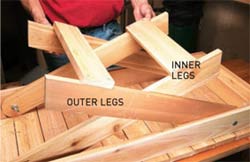
8. Test the fit of the legs by pulling the legs up from the frame. Lift the wider spaced pair first so the second can be raised without catching on the stretcher of the first pair. If the legs bind and scrape, sand the sides for a smoother fit.
Finishing
Sand the table with 120-grit sandpaper. Slightly round the top edges of the slats. Brush away any dust and apply a finish. We used three coats of a Woodoc 50 to finish off the table and provide sufficient protection for outdoor use.
To use the table, simply pull out the legs, tighten the wing nuts and get ready for a braai!
TIP: Add a handle to make it easy to carry, and screw on some hooks to hang barbecue tools.
![]()
Comments
Add comment